Download the PDF instructions with diagrams here.
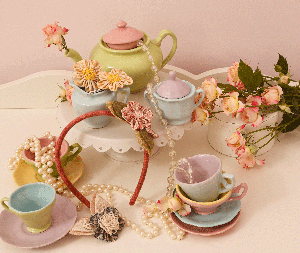
Every little girl loves to dress up like their mum and what better way to spoil them than to create these gorgeous hair accessories designed by Melissa Grant of One Day in May, Creations by Melissa Grant. Choose from a headband, hair tie or bobby pins, or why not make all three. Each piece features a selection of luscious felted wool, pretty cotton prints and some delicate embellishments including beads and cotton trim. The hair tie will dress up the simplest of ponytails you can slide a large clip or 1in wide headband through the loop of the hair tie to create an instant accessory. Alternatively, a hair tie or scrunchie may be threaded through the loop and then through itself to attach it to the flower. Your young girl will love the variety of looks she can create with these essential accessories.
Materials
Headband
One plastic headband about 10mm (⅜in) wide. If using a wider headband, see note
8 x 46cm (3 x 18in) deep pink hand-dyed felted wool (headband cover). See note
20cm (8in) square of pink floral print fabric (flowers)
18cm (7in) square of dusky green print fabric (outer leaves)
10cm (4in) square of mid green felted wool (inner leaves)
Two 14mm (⅝in) clear buttons
Hair tie
13cm (5in) square of natural hand-dyed felted wool (leaves and loop)
15cm (6in) of square blue floral print fabric (flower)
10cm (4in) square of beige tone-on-tone vine print fabric (leaves)
40cm (16in) of 10mm (⅜in) wide natural cotton trim (flower and leaf embellishment)
Bobby pins
Two white bobby pins, approximately 6cm (2½in) long
20cm (8in) square of pale yellow floral print fabric (flower)
5cm (2in) square of pale yellow felted wool (backing)
One packet of yellow seed beads (flower centre)
General requirements
Template plastic and permanent-marking pen
Threads to match your fabrics and felt
Beading and embroidery needles
Bamboo skewer or turning tool
General sewing supplies
A copy of Homespun Vol 12 No 10
Finished size:
Headband 36cm (14in) long or as for your chosen headband, hair tie 8cm (3¼in); bobby pins 7.5cm (3in)
Stitches used:
Ladder stitch, running stitch
Note: Please read all instructions before commencing the project. Careful and accurate cutting and sewing are essential to ensure success with this project. A seam allowance of ¼in is used throughout. It is recommended that fabrics, except for the felted wool, be 100% cotton, pre-washed and well ironed. If you are using a wide headband, you will need more pink hand-dyed felted wool than shown above.
Preparation and cutting headband
1. Trace the large and small leaf and the petal shapes from the pattern sheet included in your copy of Homespun Vol 12 No 10 onto template plastic with the permanent-marking pen. Cut them out carefully just inside the traced line.
2. To determine the amount of felted wool required, measure the width of your headband. Double this measurement and add ½in. This gives you the width for cutting. Measure the length of the headband and add 1in. This gives you the length for cutting.
3. Use these measurements to cut a strip from the deep pink hand-dyed felted wool.
Assembly
4. Fold the strip in half, right sides together and long edges matching. Sew across one short end and down the long raw edge. Trim the corner and, using the blunt end of a skewer or the turning tool, turn the tube right side out.
5. Feed the tube onto the headband, centring the seam on the underside. Trim the tube so that it is ¼in longer than the headband. Tuck the trimmed end into the tube and slip stitch the opening closed.
Embellishments
6. Fold the dusky green print fabric in half, right sides together. Trace three large leaf shapes onto the fabric, and cut them out on the traced lines to yield a total of six leaves.
7. Sew each pair of leaves right sides together around the curved edge, leaving the base of the leaf open. Clip the curves and turn each leaf right side out. Press.
8. Trace three small leaf shapes onto the mid green felted wool and cut them out on the traced lines.
9. Place a felted wool leaf on top of a fabric leaf from step 7, aligning the raw edges at the base. Holding the leaves together, fold them down the centre. Work running stitch for ½in in matching thread; start at the fold and stitch to the corners of the leaf base to create a small tuck, as shown by the broken white line. Trim a small wedge from the seam as shown by the black line.
10. Trace five petal shapes onto the pink floral print fabric and cut them out on the traced lines. Fold a petal in half, wrong sides together. Thread a needle with a 30cm (12in) length of doubled matching thread and work a row of large running stitches about ⅛in from the curved raw edges.
11. Using the same thread, repeat step 10 for the remaining four petals to create a strand of five petals.
12. Gently pull the thread, gathering up the petals tightly. Work a few securing stitches to join the edges of the first and last petals together. The hole in the centre needs to be very small. It may be helpful to make a few stitches in the centre, drawing the fabric in more closely. Knot and trim the threads.
13. Repeat steps 1012 to make a second flower.
14. Referring to the photograph as a guide, experiment with the placement of your leaves and flowers on the headband, using pins to hold each element in place. When you are happy with the arrangement, Melissa recommends taking a photo of the headband to help you position the pieces later. Remove the flowers and put them aside.
15. Fold the tuck at the base of a leaf to one side. Hold the leaf and the headband together between your thumb and fingers and take a look at where the base of the leaf comes into contact with the headband. This is where you need to sew the leaf into place. It wont necessarily be along the edge of the leaf.
16. Using a double strand of thread, ladder stitch the back of the leaf to the headband, securing the leaf in place along ¾in from the base towards the tip.
17. Repeat steps 1516 for the remaining two leaves.
18. Reposition your flowers, referring to your photograph as a guide. Using ladder stitch, sew the back of the flowers to the headband/leaves, making sure you hide the raw edges of the leaves and flowers underneath. Stitch near the base of the petals where possible to avoid them being distorted or pulled out of place.
19. Sew a clear button in the centre of each flower.
Preparation and cutting hair tie
20. Trace the medium leaf shape from the pattern sheet included in your copy of Homespun Vol 12 No 10 onto template plastic with the permanent-marking pen. Cut it out carefully just inside the traced line.
21. Fold the beige tone-on-tone vine print fabric in half, right sides together. Trace two medium leaf shapes onto the fabric and cut them out on the traced lines to yield a total of four leaves. Repeat step 7.
22. Trace two medium leaf shapes on the natural hand-dyed felted wool and cut them out on the traced lines.
23. Repeat step 9, placing the felted wool leaf underneath the fabric leaf.
24. Repeat steps 1012 using the blue floral print fabric.
25. Cut a 2 x 3in rectangle from the natural hand-dyed felted wool. Fold it in half, matching the long edges, and sew to yield a tube. Turn the tube right side out and position the seam in the centre back. Press.
26. At each end, tuck the raw edges into the tube and slip stitch the openings closed. Butt the ends of the tube up against each other and stitch together securely to make a loop. This will be used as a base to attach the leaves and flower to. It will also be used to slide a large hair clip through or as a place to attach a large hair tie.
27. Pin the leaves onto the loop, referring to the photograph for placement. Sew the leaves in place as you did in steps 1516.
28. Trim a 2½in length of natural cotton trim and make a loop. Place the loop over the top of the leaf so that its raw edges are aligned with those on the leaf. Stitch it into position at the base of a leaf. Repeat for the remaining leaf.
29. Pin the flower into position, then repeat step 18.
30. To make the flower centre, cut a 12in length of natural cotton trim. Fold the end of the trim over at one end so that the raw edge is pointing down. Using a double strand of thread, work a few stitches at the base to secure. Wind the trim around in a spiral, securing it with stitches as you go.
31. Arrange the “petals” of the trim so that they are pleasing to the eye by creating small loops of trim or moving the trim further away from the centre. Continue to wind and stitch the trim until you have a flower with a diameter of 11¼in.
32. Take the remaining tail of trim to the centre of the back and stitch it in place. Cut the excess trim from the flower but still leave the thread attached.
33. Use the attached thread to sew the flower centre in place.
34. Flatten out the loop at the back, rolling it a little towards one of the leaves. Sew the end of it down, attaching it to the back of the leaf, using ladder stitch.
Preparation and cutting bobby pins
35. Trace the circle for the backing from the pattern sheet included in your copy of Homespun Vol 12 No 10 onto template plastic with the permanent-marking pen. Cut it out carefully just inside the traced line.
36. Repeat steps 1012 to make two flowers using the pale yellow floral print fabric.
37. Trace two circles on the pale yellow felted wool and cut them out on the traced lines. Centre a felted wool circle on the back of a flower from step 36 and secure it by working running stitch ⅛in from the raw edge. Repeat for the remaining flower.
38. To create the beaded centre, work a few securing stitches in the centre of the flower with a double strand of thread. Thread five beads onto the beading needle and draw the thread through. Work another stitch, bringing the needle out in a different position within the flower centre. Thread five beads in the same manner and take the needle through.
39. Repeat step 38, making a securing stitch between every three loops or so to prevent the beads coming loose. Keep working the beaded loops in various directions until you have a flower centre with a diameter approximately ¾in.
40. Hold the closed end of a bobby pin over the felted circle on the back of a flower. Using a matching thread and several stitches, securely attach the bobby pin to the felt. Repeat for the remaining flower and pin.
For more information on other delightful designs by Melissa Grant of One Day in May, Creations by Melissa Grant, email:
melissa.odim@gmail.com or visit Melissas blog at http://onedayinmay.typepad.com. Wholesale enquiries for Melissas patterns can be directed to Pattern Press at PO Box 390, Lenah Valley Tas 7008, phone (03) 6278 7507, fax: (03) 6278 7506, email: info@patternpress.com.au or visit the website at www.patternpress.com.au
For more information on the delightful cotton fabrics used in Melissas headband, contact Quilters Barn by phone on (03) 5659 8271 or visit their website at:
www.quilters-barn.com The felted wool that Melissa chose for her project is available from Foothills Fabric and Threads. Visit 1553A Burwood Highway, Tecoma Vic 3160 or phone them on (03) 9754 6166. The divine natural cotton trim featured in the hair tie is available from the Craft Queen. Phone (02) 6362 6008 or visit their website at www.craftqueen.com.au for more information.