Download the instructions with full diagrams here.
Donwload the pattern templates: 1 / 2 / 3 / 4 / 5 / 6 / 7
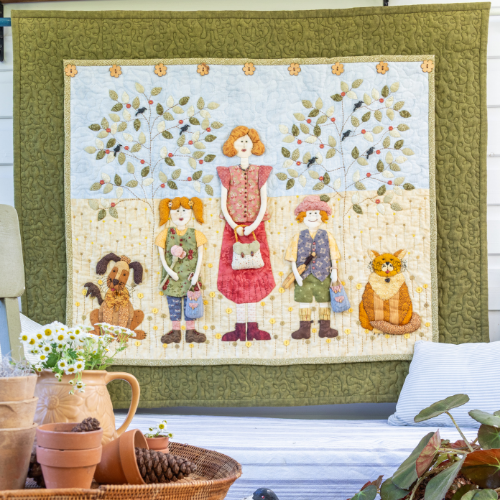
When William Shakespeare penned his tragic tale of Romeo and Juliet, little did he know that his work would continue to enrapture the hearts of millions throughout the world some four centuries later. One such heart is that of Jennifer Reynolds of Jenny of Elefantz who has embroidered some of the most famous lines from this romantic play in a delightful project that incorporates an assortment of French General fabric designed by Kaari Meng for Moda. The result is a “scentsational” lap quilt that will not only bring the beauty of the garden indoors but will also remind someone special of Shakespeares incredible talent with the written word.
Materials
35cm (½yd) cream with beige toile print fabric (appliqué and stitchery background)
Fat quarter cream with blue small floral print fabric (appliqué background)
Fat quarter dark red floral print fabric (appliqué)
15cm (6in) square of brown tone-on-tone fabric (appliqué)
Fat eighth red with tan medium floral print fabric (Border 1)
Five assorted fat 16ths in blue prints (Borders 2 and 5). One of the fabrics will also be used for the appliqué
Four assorted fat 16ths in red/cream prints (Borders 2 and 5)
75cm (⅞yd) red tone-on-tone small floral print fabric (Borders 3 and 6, and binding)
85cm (1yd) dusky blue daisy print fabric (Border 4, Border 5 cornerstones and Border 8)
25cm (⅜yd) light beige with red floral print fabric (Border 7)
116 x 137cm (46 x 54in) backing fabric
Batting at least 116 x 137cm (46 x 54in)
65cm (¾yd) fusible stabiliser such as Whisperweft
Double-sided fusible web
DMC Stranded Embroidery Cotton in Very Dark Salmon (347), Tan (436) and Medium Grey Green (926)
Embroidery needle
2B pencil and brown Pigma pen
Rotary cutter, ruler and mat
Sewing machine with ¼in foot
General sewing supplies
Finished size: 104 x 123cm (41 x 48½in)
Stitches used: Back stitch, blanket (pinwheel) stitch, French knot
Note: Please read all instructions before commencing the project. Careful and accurate cutting and sewing are essential to ensure success with this project. A seam allowance of ¼in is used throughout for the patchwork. It is recommended that fabrics be 100% cotton, pre-washed and well ironed. Requirements are based on fabric and stabiliser 112cm (44in) wide. All embroidery is worked with two strands of thread.
Cutting
1. From each of the cream with beige toile print fabric and the fusible stabiliser, cut:
One square, 12in (centre appliqué)
Two strips, 5 x 14in (stitchery background)
Two strips, 5 x 13in (stitchery background).
2. From each of the cream with blue small floral print fabric and the fusible stabiliser, cut:
Two rectangles, 9 x 15in (appliqué background).
3. From the assorted blue and red/cream print fabrics, cut a total of:
34 squares, 3½in.
4. From the red with tan medium floral print fabric, cut:
Two strips, 1½ x 10½in (Border 1)
Two strips, 1½ x 12½in (Border 1).
5. From the red tone-on-tone small floral print fabric, cut:
Two strips, 1½ x 18½in (Border 3)
Two strips, 2½ x 20½in (Border 3)
Two strips, 1½ x 22½in (Border 6)
Two strips, 1½ x 26½in (Border 6)
Five strips, 2½in across the width of the fabric (binding).
6. From the dusky blue daisy print fabric, cut:
Two strips, 3½ x 22½in (Border 4)
Two strips, 2½ x 26½in (Border 4)
Two squares, 3½in (Border 5 cornerstones)
Two strips, 3¾ x 40½in (Border 8)
Two strips, 4½ x 41in (Border 8).
7. From the light beige with red floral print fabric, cut:
Two strips, 3½ x 22½in (Border 7).
Embroidery and appliqué
8.Print the stitchery design and appliqué shapes from the Homespun website. Before printing, check the Print dialog box it is important that in the field next to the words “Page Scaling” you have selected “None”. Carefully match the two printed pages for the centre-panel appliqué shapes and tape them together to give you the full design.
9. Using the Pigma pen, lightly trace the words for each line from the play on to the cream with beige toile print strips. Lines 1 and 3 should be traced in the centre of the 5 x 14in strips and lines 2 and 4 should be traced in the centre of the 5 x 13in strips. Fuse the matching strips of stabiliser to the wrong side of each of these fabric strips.
10. Using Very Dark Salmon (347), work back stitch for the letters, adding a two-wrap French knot above the is, for the base of the question mark and for the full stop.
11. Trim the fabric strips for lines 1 and 3 to measure 3½ x 12½in; trim the fabric strips for lines 2 and 4 to measure 3½ x 11½in with the embroidery centred.
12. Using the pencil, trace the appliqué shapes onto the paper side of the fusible web, leaving about ½in between them. They have been printed in reverse to assist you. You will need to trace one of each of the shapes for the border appliqué designs and one of each of the shapes for the centre panel.
13. Cut out all of the shapes roughly do not cut on the pencil lines yet. Fuse the shapes to the wrong side of your selected fabrics and cut them out on the traced lines.
14. Peel the backing paper off the shapes for the centre panel and fuse them to the 12in cream with beige toile print square, overlapping the shapes where necessary and referring to the photograph as a guide. Fuse the remaining shapes to the 9 x 15in cream with blue small floral print rectangles, referring to the photograph as a guide. Fuse the matching square and rectangles of stabiliser to the wrong side of the appropriate blocks.
15. Work blanket stitch around the raw edges of each shape using Very Dark Salmon (347) for the roses, Tan (436) for the stems and Medium Grey Green (926) for the leaves.
16. Trim the centre panel to measure 10½in square from raw edge to raw edge, with the design centred. Trim the remaining appliqué blocks to measure 7½ x 12½in from raw edge to raw edge, with the designs centred.
Assembly
Border 1
17. Sew the 1½ x 10½in red with tan medium floral print strips to the left and right edges of the centre panel and press seams outwards. Sew the 1½ x 12½in strips cut from the same fabric to the top and bottom edges of the centre panel and press seams outwards.
Border 2
18. Select 20 of the assorted blue and red/cream print squares for Border 2. Lay them out in two rows of four squares each and two rows of six squares each. When you are happy with the colour placement, sew the squares in each row together.
19. Sew the four-square strips to the left and right edges of the centre panel and press seams outwards. Sew the six-square strips to the top and bottom edges of the centre panel and press seams outwards.
Border 3
20. Sew the 1½ x 18½in red tone-on-tone small floral print strips to the left and right edges of the quilt and press seams outwards. Sew the 2½ x 20½in strips cut from the same fabric to the top and bottom edges of the quilt and press seams outwards.
Border 4
21. Sew the 3½ x 22½in dusky blue daisy print strips to the left and right edges of the quilt and press seams outwards. Sew the 2½ x 26½in strips cut from the same fabric to the top and bottom edges of the quilt and press seams outwards.
Borders 5, 6 and 7
22. Sew 10, 3½in assorted print squares into two rows of five squares each. Sew the panels embroidered with lines 2 and 4 to one edge of each of these five-square strips, referring to the photograph as a guide. Press seams towards the pieced strips.
23. Sew the strip+panel with line 2 to the right edge of the quilt, with the base of the letters closer to the quilt centre. Sew the strip+panel with line 4 to the left edge of the quilt in the same manner. See diagram 1.
24. Sew the 1½ x 26½in red tone-on-tone small floral print strips to the left and right edges of the quilt and press seams outwards.
25. Sew a 3½in dusky blue daisy print square to the right edges of each of the panels embroidered with lines 1 and 3. Sew the 1½ x 3½in red tone-on-tone small floral print strips to the right edge of the dusky blue squares, as shown in diagram 2.
26. Sew the remaining 3½in assorted print squares into two rows of two squares each. Sew a row to the left edge of the panels embroidered with line 1 and 3.
27. Sew the 1½ x 22½in red tone-on-tone small floral print strips to the top edges of these sections and press seams outwards. Then sew the 3½ x 22½in light beige with red floral print strips to the top edges and press seams outwards.
28. Referring to diagram 4, sew the remaining appliqué blocks to the left edge of these pieced panels created in steps 2227 and press seams outwards.
29. Sew the panels from step 28 to the top and bottom edges of the quilt and press seams outwards.
Border 8
30. Sew the 3¾ x 40½in dusky blue daisy print strips to the left and right edges of the quilt and press seams outwards. Sew the 4½ x 41in strips cut from the same fabric to the top and bottom edges of the quilt and press seams outwards.
Quilting and binding
31. Smooth out the backing fabric on a large table or the floor with right side down and secure it with masking tape. Lay the batting on top, ensuring it is smooth and free from wrinkles. After pressing the quilt top, lay it on top of the batting and baste the three layers together with thread or safety pins.
32. Quilt as desired. Jennifer stitched in the ditch by machine.
33. Trim away the excess batting and backing fabric ¼in outside the edges of the quilt.
34. Cut the ends of the 2½in red tone-on-tone small floral print strips for the binding at a 45-degree angle. Join the strips to make one long length, trim the seams and press them open. Fold the long strip in half, wrong sides together and long edges matching, and press. With raw edges together, stitch the binding strip to the edge of the quilt using a ¼in seam, mitring the corners as you go and referring to the diagrams on page 53 of Homespun Vol 12 No 8 for details.
35. Turn the binding over and stitch it by hand to the back of the quilt. Label and date your quilt.
For more information on other charming designs by Jennifer Reynolds of Jenny of Elefantz, write to 17 Anne Street, Charters Towers Qld 4820, ph: (07) 4787 7386, email:
jennyofelefantz@bigpond.com or visit her blog at www.elefantz.com
Wholesale enquiries or details of your nearest stockist of French General fabrics can be directed to PK Fabrics. Contact PK Fabrics by phone on (02) 9557 2033, email:
sales@pkfabrics.com.au or visit their website at www.pkfabrics.com.au