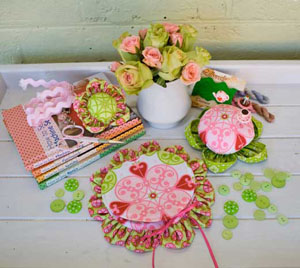
Download Flower Power Sewing Accessories Instructions here.
Who says you have to have boring sewing accessories while you create? Why not get to work making these delightful sewing sensations designed by Khristina McCarthy of Sew Prim Khris out of your favourite fabrics. Comprising a wrist pincushion, a needlecase and a tabletop pin cushion, these quick and easy little gems will have you designing with flair in no time.
Materials
Fat quarter of pink medallion print fabric (pincushion, wrist pincushion and needlecase)
Fat quarter of green medallion print fabric (wrist pincushion)
Fat quarter of green spot print fabric (pincushion)
Fat quarter of green with pink spot print fabric (wrist pincushion and needlecase)
13 x 22cm (5 x 9in) lime green felt (needlecase)
48cm (19in) of 3mm wide pink satin ribbon (needlecase tie)
Embroidery needle
Scrap of thin batting
25mm (1in) cream velcro or 20cm (8in) of 6mm (¼in) wide elastic
Polyester fibre fill
Compass
Thin cardboard, paper and 2B pencil
Template plastic and permanent marking pen
Rotary cutter, ruler and cutting mat
Sewing machine with ¼in foot
General sewing supplies
A copy of Homespun Vol 11 No 8
Finished size: Pincushion – 8cm (3¼in) diameter, wrist pincushion 12.5cm (5in), needlecase 16.5cm (6½in) diameter
Stitches used: Running stitch, whip stitchNote: Please read all instructions before commencing the project. Careful and accurate cutting and sewing are essential to ensure success with this project. A seam allowance of ¼in is included throughout unless otherwise stated. It is recommended that fabrics be 100% cotton, pre-washed and well ironed. Requirements are based on fabric 112cm (44in) wide.
Cutting PINCUSHION
1. Use a compass to draw circles onto the thin cardboard, with the following radii:
1¼in (A)
1¾in (B)
2⅜in (C)
3⅛in( D)
2. Label each of the circles, then cut them out on the line.
3. Position the templates on the fabrics, then trace and cut:
Five Template C on the green spot print fabric (petals)
One Template D and one Template B on the pink medallion print fabric (pincushion centre and base).
4. Trace around Template A on the template plastic using a permanent marking pen and cut it out on the line.
Assembly
5. Fold each green C circle in half, wrong sides together, and press. Thread your needle with a length of cotton to match the green spot print fabric and knot the end. Work small running stitches around the curved raw edge of a C petal circle. Draw the threads up until the petal measures about 1in wide at the bottom.
6. Repeat step 5 for the remaining four petals, using the same thread so that the petals are all joined together on one length of thread. Take the needle back into the first petal to create a circle of petals.
7. Thread your needle with a length of cotton to match the pink medallion print fabric and knot one end. Work small running stitches about ¼in from the raw edge of the pink D circle. Pull up the threads slightly, then stuff the circle firmly with fibre fill. This will be the pincushion. Tie off the threads to secure the stuffing inside it.
8. Place the pincushion on top of the circle of petals you made in step 6. Make sure that the petals are curving upwards, as shown in the step 6 photograph. Pin it in place on the petals (pinning from the wrong side of the petals is easiest), then whip stitch to secure it.
9. Using thread to match the pink medallion print fabric, work running stitch about ¼in from the raw edge of the pink B circle. Lay it right side down on your work surface. Centre the A circle cut from template plastic on the wrong side of it, then pull up the threads to gather the fabric around the plastic. Tie off the threads.
10. Position the covered template plastic base on the back of the pincushion with the gathered side against the back of the pincushion and slip stitch it in place.
Cutting WRIST PINCUSHION
11. Use a compass to draw circles on the thin cardboard, with the following radii:
1in (E)
1½in (F) (petals)
2⅝in (G) (centre).
12. Label each of the circles, then cut them out on the line.
13. Position the templates on the fabrics, then trace and cut:
Five Template F on the green with pink spot print fabric (petals)
One Template F on the pink medallion print fabric (base)
One Template G on the green medallion print fabric (centre).
14. Trace around Template E on the template plastic using a permanent marking pen and cut it out on the line.
15. Measure your wrist and add 1½in. Decide whether to make a Velcro strap or an elastic one.
16. From the green with pink spot print fabric, cut:
One strip, 2½in x step 15 measurement (Velcro strap) or
One strip, 3in x step 15 measurement (elastic strap).
Wrist strap
Velcro strap
17. Fold the green with pink spot print strip in half, right sides together and long edges matching. Stitch around all four edges, leaving a 1in opening for turning. Turn the strip right side out and press. Slip stitch the opening closed.
18. Cut a strip of Velcro about 1in long. Peel the Velcro apart and sew one side on each end of the strap.
Elastic strap
19. Fold the green with pink spot print strip in half, right sides together and long edges matching. Stitch down each long edge, leaving the short edges open. Turn the strip right side out. Roll the seam to the middle of the strip and press.
20. Audition the length of elastic around your wrist and determine a comfortable fit. Trim the elastic to this length. Insert a safety pin in one end of the elastic and thread it through the fabric strip. Machine sew across one short end of the fabric strip, about ⅛in from the opening to secure the elastic in place.
21. Pull the elastic from the other open end of the strip to stretch it. Use pins down the middle of the strip to keep the stretched elastic in place. Stitch down the centre of the strip, through the fabric and the elastic. Stop stitching ½in from the open end of the strip. Top stitch close to both long edges of the elasticised strip, again stopping ½in from the open end. Turn the raw edges in by ½in. Insert the other end of the strip inside this end and slip stitch the opening closed.
Assembly
22. Repeat steps 510, this time making petals from the F circles cut from green with pink spot print fabric, the pincushion centre from the G circle cut from green medallion print fabric and the back from the pink F circle and E plastic circle.
23. Pin the centre of the wrist strap on the centre back of the pincushion. Slip stitch the strap in place on either side of the strap for approximately 1in.
Cutting NEEDLECASE
24. Trace Templates H and J from the pattern sheet inserted in Homespun 11.8 onto paper, and cut them out. Glue the shapes onto thin cardboard, as this provides a sturdier template to trace for accurate construction.
25. Use a compass to draw a circle with a radius of 2 1/16in (I) on the thin cardboard.
26. Label each of the shapes, then cut them out on the line. You will also use Template C made in step 1.
27. Position the templates on the fabrics/batting, then trace and cut:
11 Template C on the green with pink spot print fabric (petals)
One Template G on the pink medallion print fabric (needlecase front)
One Template I from batting
One Template J from lime green felt. Keep this shape intact ignore the line marked “cut” on the template.
28. Trace around Templates I and J on template plastic using a permanent marking pen and cut them out on the line. Cut the J template in half on the line labelled “cut”.
29. Fold the remaining pink medallion print fabric in half, right sides together and trace one template H. The traced line will be your sewing line, so do not cut this shape out at this stage.
Assembly
30. Repeat steps 56 to make and join 11 petals.
31. Using thread to match the pink G circle, work running stitch about ¼in from the raw edge of the shape. Lay it right side down on your work surface. Centre the I circle cut from batting on the wrong side of it. Lay the I circle cut from template plastic on top of it, then pull up the threads to encase the batting and plastic for the centre front of the needlecase. Tie off the threads.
32. Slip stitch the centre front of the needlecase to the petals, with the curves of the petals facing up.
33. Sew around the Template H shape (from step 29) on the traced line, leaving the two ends open as marked. Turn the shape right side out. Turn in the raw edges at the openings by ¼in and press.
34. Roll up the two template plastic shapes that you created when you cut the J shape in half in step 28 and squeeze them through the two openings in the H shape, with their flat edge towards the middle.
35. Cut the length of ribbon in half. Insert ½in of ribbon inside each opening and pin to hold them in place. Pin around the whole shape to keep the template plastic in the middle. Top stitch around the outer edge, catching the ends of the ribbon in the seam, and closing the openings at the same time.
36. Centre the J felt shape inside the H shape. Stitch down the middle of the felt shape to secure it. Fold the needlecase in half and tie the ribbon neatly.
37. Position the needlecase on the back of the needlecase front and pin in place, covering the raw edges. Slip stitch the two layers together.
For more information on other sweet designs by Khristina McCarthy of Sew Prim Khris, phone 0418 880 354, email:
khristina66@gmail.com or visit her blog at www.sewprimkhris.blogspot.com