Download the PDF with full diagrams and images here.
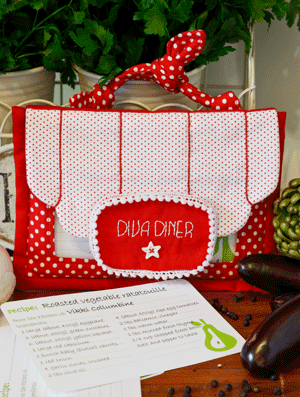
With Christmas just around the corner, what better way to prepare for the family feast than to create this handy recipe holder? Its is the perfect place to keep all your favourite festive recipes close at hand. Designed by Vikki Collumbine of Sew Useful Designs, this unique project features a plastic window to keep your recipe cards protected from any food splatters, and some handy straps at the back so it can hang from a cupboard handle or knob when in use.
Materials
Fat eighth white with red mini spot print fabric (outer flap and flap lining)
20cm (¼yd) red small spot print fabric (frame, backing, straps and handle)
25cm (¼yd) red fabric (name plate, binding and lining)
20cm (¼yd) medium-weight fusible batting such as Parlan
DMC Stranded Embroidery Cotton in Very Dark Salmon (347) and Winter White (3685)
Embroidery needle
One 12mm (½in) white star button
36cm (14in) of 12mm (½in) wide white pompom trim
Two 30mm (1¼in) white D-rings
One 40-card pack of 10 x 15cm (4 x 6in) recipe cards
Sturdy transparent plastic. Vikki used the front cover of an A4 document wallet purchased from her local supermarket
Hot glue gun and glue sticks
Fabric glue stick. Vikki recommends Sewline
Erasable fabric-marking pencil with dark lead. Vikki recommends Sewline
Thin cardboard, paper and HB pencil
Chopstick and Fray Stoppa (optional)
Rotary cutter, ruler and mat, plus an additional rotary cutter for cutting plastic
Sewing machine with ¼in foot
General sewing supplies
A copy of Homespun Vol 12 No 11
Finished size: 15 x 20.5cm (6 x 8¼in)
Stitches used: Back stitch, chain stitch, ladder stitch, whip stitch
Note: Please read all instructions before commencing the project. Careful and accurate cutting and sewing are essential to ensure success with this project. A ¼in seam allowance is used throughout, except for the handle and flap which are worked using the trace, sew and cut method; that is, the traced lines are the stitching lines and a seam allowance is added when cutting these shapes out. It is recommended that fabrics be 100% cotton, pre-washed and well ironed. Requirements are based on fabric and batting 112cm (44in) wide. All embroidery is worked with two strands of thread.
Preparation and cutting
1. To make patterns for each of the shapes printed on the pattern sheet in Homespun 12.11, trace them onto paper, transferring all markings, and cut them out on the traced lines.
2. Glue the patterns onto thin cardboard, as this provides a stiffer template to trace for more accurate construction. Cut these shapes out of cardboard.
3. From the red small spot print fabric, cut:
Two rectangles, 5½ x 8in (frame and backing)
Four strips, 1½ x 3½in (straps).
4. From the red fabric, cut:
One strip, 2½in across the width of the fabric. Crosscut the strip to yield three strips, 2½ x 8in and one strip, 2½ x 9½in (binding).
Two strips, 2½ x 7in (binding)
Two rectangles, 5½ x 8in (inner lining)
Two rectangles, 3 x 4½in (name plate).
5. From the fusible batting, cut:
Two rectangles, 5½ x 8in (frame and backing)
One rectangle, 3 x 4½in (name plate).
6. From the plastic, cut:
One rectangle, 3½ x 6½in (window).
Name plate
7. Using the fabric pencil, lightly trace the wording from the pattern sheet onto the right side of a 3 x 4½in red rectangle. A light source such as a window, light box or glass-topped table with a desk lamp placed underneath will help to make the design more visible through the fabric. Fuse the matching batting rectangle to the wrong side of the fabric. Using Winter White (3685), work back stitch for the wording.
8. Position the remaining 3 x 4½in red rectangle right side down on the pattern printed on the pattern sheet and trace the outer border with the fabric-marking pencil. Match this rectangle with the embroidered rectangle, right sides together, and sew around the shape on the traced line, leaving a 1in opening for turning. Clip the curves and turn the shape right side out. Press the seams out, using the chopstick if you wish, then slip stitch the opening closed. Press.
9. Cut a length of white pompom trim 1in longer than the perimeter of the label (approximately 12in) and sew it to the outer edge using matching thread. When you reach the beginning, cut any excess trim to create a seamless join; secure the ends of the trim together with a few stitches. Dab a small amount of Fray Stoppa on the join if you wish to prevent it from fraying.
10. Sew the star-shaped button under the embroidered wording, referring to the photograph as a guide, using Very Dark Salmon (347).
Handle
11. Fold the remaining red small spot print fabric in half, right sides together. Lay the handle template on the fabric and trace around the shape twice, leaving ½in between the shapes. Cut a rectangle of batting big enough to cover both traced handle shapes and fuse it to the wrong side of the fabric, on the side that you havent traced on. See diagram 1.
12. Sew around each handle shape on the traced line, leaving an opening for turning as indicated. Cut out each shape ¼in outside the sewn line, clip the curves and points and turn each handle right side out. Use the chopstick to push the corners out, then press. Slip stitch the openings closed. Top stitch around each handle, ⅛in from the edge.
Outer case
13. Fuse a 5½ x 8in batting rectangle to the wrong side of each matching red rectangle.
14. Lay one of the 5½ x 8in red small spot print rectangles right side down on the cutting mat, with the longer edges running horizontally. Measure 1¼in in from each side edge, 1in up from the bottom edge and 1¾in down from the top edge. Draw a rectangle using the quilting ruler and fabric pencil; it should measure 2¾ x 5½in. This will now be referred to as the opening.
15. Carefully cut out the window ¼in inside the drawn lines of the opening. Carefully clip in each corner up to 1mm (1/16in) from the drawn line. (Because youre not clipping right into the corner, the corner should roll under slightly, hiding any fraying on the raw edges).
16. Turn the seam to the wrong side and fold on the drawn lines. Finger press them in place. To prevent the fabric from moving, adhere the turned edge in place with the fabric glue stick.
17. Repeat steps 1416 for one of the 5½ x 8in red fabric/batting rectangles for the lining, however this time clip right into the corners before turning the seam under and gluing it. This will ensure that the window of the lining is slightly bigger than that of the front panel, hiding it from view when the joined panel/lining is top stitched.
18. Place the front panel on top of the lining, wrong sides together, and align the windows. The window in the front panel should be marginally smaller than that in the lining and therefore the lining should’nt be visible from the front. Pin them together, then top stitch around the window ⅛in from the edge. Liberally dab some Fray Stoppa into each corner of the turned seams to prevent them from fraying.
19. Position the front panel right side down on a flat surface. Centre the 3½ x 6½in plastic rectangle over the window opening, then use the hot glue gun to glue it in place.
20. Fold a 2½ x 8in red strip in half, wrong sides together and long edges matching. Press. With raw edges together, stitch the binding strip to the top edge of the front panel using a ¼in seam. Turn the binding over and stitch it by hand to the back of the front panel through the lining and batting only so that your stitches wont show on the front of the panel.
21. Place the remaining 5½ x 8in red rectangle on top of a matching red small spot print rectangle, right sides together. This will become the back panel. Repeat step 20 to attach a binding strip to the top edge of the back panel.
22. To make the straps to secure the D rings on the back of the recipe holder, match two 1½ x 3½in red small spot print strips right side together. Sew around the outer edge of the strip, leaving one short end open. Clip the corners and turn the strip right side out. Use the chopstick to push the corners out, tuck the raw edges under by ¼in, press, and sew the opening closed.
23. Repeat step 22 for the remaining 1½ x 3½in red small spot print strips.
24. Slide a D ring half way up one of the straps and then fold the strap over until the short ends meet. Position the folded strap ¾in in from the right edge of the back panel so the top of the D ring is aligned with the top edge of the panel. Pin the strap in place.
25. Repeat step 24 with the remaining D ring and strap, positioning it ¾in in from the left edge of the back panel. See diagram 4.
26. Sew the straps in place by sewing a square in the bottom edge of the straps, as shown in diagram 4.
Vikki’s Tip
To achieve an unpuckered curved edge on the flap, clip up to 1mm (1/16in) from the very stitch that pivots between one side of the curve and the other, then clip around the curves as usual. See diagram 5.
Flap
27. Fold the white with red mini spot print fabric in half, right sides together and short edges matching. Lay the flap template on the fabric so that there is at least ½in of fabric all the way around it. Trace around the flap template using the fabric-marking pencil. On the other side of the folded fabric, fuse a rectangle of batting that is at least ½in larger than the traced shape.
28. Sew around three edges of the flap shape on the traced line, leaving the straight edge opening for turning. Cut the shape out ¼in outside the sewn line and on the traced line of the straight edge. Clip into the curves and turn the flap right side out. Press.
29. Place the flap right side up on a flat surface. Measure 1in in from the right side edge and draw a line parallel to the side of the fabric, from the top edge approximately 3in down toward the curved edge. Stop here and position a 10 cent coin or another small round object with a diameter of about 24mm (1in) that can be used as a template, on the right side of the drawn line until the rounded edge of the coin meets the curved point on the lower right edge. (Readers in the USA could use a quarter; readers in the UK could use a 10p coin.) Once lined up correctly, continue to draw around the coin so that the drawn line tapers to the curved point.
30. Repeat step 29 for the left side of the flap.
31. Draw a further two lines in the centre of the flap, 1¾in inside the first two lines, stopping 2in up from the bottom edge of the flap. Using Very Dark Salmon (347), work chain stitch along the traced lines, working your stitches only through the top fabric and batting so that the stitching will not be visible on the underside of the flap.
32. Repeat step 20 to bind the top edge of the bag flap using the 2½ x 9½in red strip. Fold the short raw ends of the binding strip in by ¼in.
Assembly
33. Match the front and back panels with wrong sides together and pin. Repeat step 32 to bind the bottom edge of the recipe holder using the remaining 2½ x 8½in red strip. Use the 2½ x 7in red strips to bind the left and right edges of the recipe holder in the same manner.
34. Position the flap right side down on a flat surface. Then lay the front/back panels right side down, centring them on top of the flap with the top edges aligned. The flap should sit flush between the binding on the left and right sides of the recipe holder. Pin the binding on the top edge of the flap to the binding on the top edge of the bag panel. Ladder stitch it in place.
35. Place the recipe holder right side up and position the name plate on the lower half of the flap; the name plate should cover the ends of the two rows of chain stitch. Whip stitch the name plate in place or use the hot glue gun to adhere it to the label.
36. Slip the small end of a handle through one of the D rings and tie a knot. Repeat with the remaining handle on the opposite side. Place the recipe cards inside the holder and prop it up on a kitchen workbench, thread one of the straps through a cupboard handle or pop it over a cupboard knob for easy access to your favourite recipes.
For more information on other unique designs by Vikki Collumbine of Sew Useful Designs, phone (03) 9762 1464, email:
sewusefuldesigns@hotmail.com or visit Vikkis blog at www.sewusefuldesigns.blogspot.com