Download the PDF with images here.
Download the templates here 1 / 2 / 3 / 4 / 5 / 6 / 7 / 8 / 9
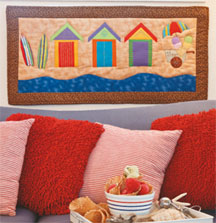
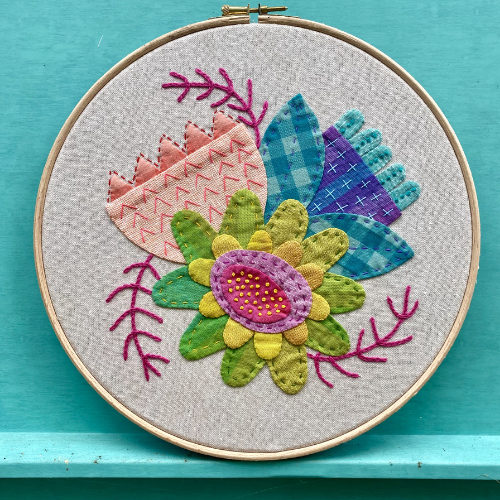
A day at the beach not only involves a heavy coating of sunscreen and some time splashing in the water or riding the waves, but also a treat or two from the local icecream vendor. Being residents of the sunny state of Queensland, Andrea and Marie Chitakis had lots of fun creating this colourful wallhanging in honour of Homespuns Summertime-themed issue. Perfect for the beginner crafter, this quick and easy appliqué project uses just two embroidery stitches meaning that you’ll have it hanging in your home in no time at all.
Materials
1.2m (1⅜yd) tan tone-on-tone mottled print fabric (appliqué background, backing and hanging sleeve)
15cm (¼yd) mottled blue print fabric (ocean appliqué)
Assorted scraps of print and plain fabric in red, orange, blue, green, yellow, purple, pink and brown. Andrea and Marieann used some sparkly fabric for the icecream.
50cm (⅝yd) brown vine print fabric (border and binding)
Batting at least 55 x 106cm (22 x 42in)
DMC Stranded Embroidery Cotton in colours to match appliqué fabrics
No 12 appliqué (sharp) needles
13cm (5in) embroidery hoop (optional)
Water-erasable fabric-marking pen
Double-sided fusible web
Rotary cutter, ruler and cutting mat
Sewing machine with ¼in foot
General sewing supplies
Finished size
51 x 102cm (20 x 40in)
Stitches used
Back stitch, whipped back stitch
Note: Please read all instructions before commencing the project. Careful and accurate cutting and sewing are essential to ensure success with this project. A seam allowance of 6mm (¼in) is included throughout. It is recommended that fabrics be 100% cotton, pre-washed and well ironed. Requirements are based on fabric 112cm (44in) wide. All embroidery is worked with two strands of thread unless otherwise stated.
Instructions are provided for fusible-web appliqué worked by hand but the project lends itself to a variety of different appliqué techniques. Adapt the instructions to suit the method of your choice.
Cutting
1. From the tan homespun, cut:
One rectangle, 16 x 36in (appliqué background)
One rectangle, 23in across the width of the fabric (backing)
One strip, 4 x 40in (hanging sleeve).
2. From the brown vine print fabric, cut:
Two strips, 2½ x 16in (border)
Two strips, 2½ x 40in (border)
Three strips, 2½in across the width of the fabric (binding)
Appliqué and embroidery
3. Print the patterns for this project from the Homespun website. Before printing, check the Print dialog box it is important that in the field next to the words “Page Scaling” you have selected “None”. Tape the pages together as indicated to give you the complete, full-size patterns. The shapes have been provided in reverse, ready for tracing on to fusible web.
4. Using the pencil, trace the appliqué shapes onto the paper side of the fusible web leaving at least ½in between them.
5. Cut out the shapes roughly do not cut on the pencil lines yet. Select the fabrics you desire for each appliqué shape and then fuse each shape to the back of the selected fabric. Cut out each shape carefully on the pencil line.
6. Peel the backing paper off each appliqué shapes and using the photograph as a guide, place the shapes onto the 16 x 36in rectangle of tan fabric, overlapping them where necessary. Once you are happy with the position of each shape, fuse them in place.
7. Using the fabric-marking pen, lightly draw the stitchery details on to the appliqué shapes by eye.
8. Place your work in the embroidery hoop, if desired, to keep it flat and prevent it puckering. Working with an embroidery hoop or frame may ensure you keep the tension even but keep in mind that leaving your project in the hoop when youre not working on it will leave crease marks which may be difficult to remove.
9. Work blanket stitch around all raw edges of the appliqué shapes in threads to match or contrast with the colour of the appliqué fabrics.
10. Using three strands of contrasting embroidery thread, work whipped back stitch for the remaining stitchery details. Once you have finished stitching, remove any pen marks by dabbing them with a damp cloth. Press.
Assembly
11. Measure your appliquéd panel vertically through the centre. Trim the 2½ x 16in brown vine print strips to the correct length, then sew them to the left and right edges. Press seams outwards.
12. Measure your panel horizontally through the centre. Trim the 2½ x 40in brown vine print strips to the correct length, then sew them to the top and bottom edges. Press seams outwards.
Quilting and binding
13. Smooth out the backing fabric on a large table or the floor with right side down and secure it with masking tape. Lay the batting on top, ensuring it is smooth and free from wrinkles. After pressing the quilt top, lay it on top of the batting and baste or pin the three layers together.
14. Quilt as desired. Andrea and Marie stitched in the ditch in the border and then hand quilted around each of the appliqué shapes.
15. Trim away the excess batting and backing fabric ¼in outside the edges of the quilt.
16. Turn under a ½in hem on each short end of the hanging sleeve strip. Press, then stitch them in place. Fold the strip in half, wrong sides together and long edges matching. Pin it to the top of the quilt backing, matching the raw edges with the top raw edge of the wallhanging.
17. Join the 2½in brown vine print strips for the binding end to end to make one long strip. Fold the long strip in half lengthwise, wrong sides together, and press. With raw edges together, stitch the binding strip to the edge of the quilt using a ¼in seam, mitring the corners as you go and referring to the diagrams on page 74 of Homespun Vol 12 No 12 for details.
18. Turn the binding over and stitch by hand to the back of the quilt.
19. Pin the bottom of the hanging sleeve to the back of the wallhanging, allowing it to bag slightly to allow for the circumference of a dowel rod and stitch it in place, taking care that your stitches are worked only through the backing fabric and batting and do not show on the front of the quilt.
For more information on other colourful designs by Andrea and Marie Chitakis of Heart of Gold Creations, write to PO Box 650, Aspley Qld 4034, phone/fax (07) 3353 4797 or 0408 726 366 or visit their website at www.heartofgoldcreations.com
