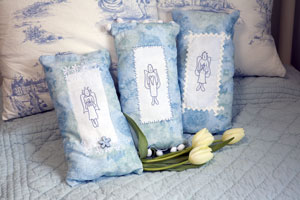
Nicole Jones of Buzzy Bee Buttons thought these charming cushions would be the perfect project for those Homespun readers needing a last-minute gift idea. As they can literally be whipped up in a matter of hours, all you need to worry about is your colour palette and your trims. Do what Nicole has done and jazz up your designs with different embellishments. Or why not create all three using the same trim for a coordinated gift.
Materials
Fat quarter white homespun (stitchery background)
1m (1⅛yd) blue rose floral print fabric (outer cushion)
DMC Stranded Embroidery Cotton in Blanc and Medium Antique Blue (931)
Embroidery needle
50cm (⅝yd) white pompom trim (optional) available from Buzzy Bee Buttons
1m (1⅛yd) of 1cm (⅜in) wide white ricrac (optional) available from Buzzy Bee Buttons
1 packet self-adhesive white flower felt ribbon (optional)
One 25mm (1in) blue wooden daisy button available from Buzzy Bee Buttons
Double-sided fusible web
Polyester fibre fill
Water-erasable fabric marking pen
Rotary cutter, ruler and mat
Sewing machine and ¼in foot
General sewing supplies
Finished size: 16.5 x 32cm (6½ x 12½in)
Stitches used: Back stitch, French knots, primitive straight stitch, straight stitch
Note: Please read all instructions before commencing the project. Careful and accurate cutting and sewing is essential to ensure success with this project. A seam allowance of 1/4in is included throughout. It is recommended that fabrics be 100% cotton, pre-washed and well ironed. Requirements are based on fabric 112cm (44in) wide. All embroidery is worked with two strands of cotton unless otherwise stated.
Preparation and cutting
1. From the white homespun, cut:
Three rectangles, 3 x 7in.
2. From the blue rose floral print fabric, cut:
Six rectangles, 8 x 13½in.
3. From the double-sided fusible web, cut:
Three rectangles, 2½ x 6½in.
Embroidery
4. Find the centre of your stitchery background fabric by folding the fabric in half and then half again. Find the centre of the design on the pattern sheet and match it to your fabric centre. Using the fabric marking pen, lightly trace the stitchery design onto the white homespun rectangle. A light source such as a window, light box or glass-topped table with a desk lamp placed underneath will help to make the design more visible through the fabric.
5. Using Medium Antique Blue (931), work back stitch for each of the designs. Work French knots for the hair on the Angel With Heart design. Work small straight stitches for the angels eyes using one strand of Medium Antique Blue (931).
6. Iron the fusible web to the wrong side of your stitchery panels and once it has cooled, peel off the backing paper. Find the centre of your blue rose floral print rectangles and centre the stitchery panel on the right side of three of these rectangles.
Assembly
Angel With Heart
5. Referring to the photograph as a guide, work primitive straight stitch (Nicole refers to this stitch as crazy straight stitch) around the border edge of the stitchery panel using Medium Antique Blue (931). Work your stitches in all different directions.
6. Cut two lengths of pompom trim approximately 7in long. Pin the pompom trim to the top and bottom of your embroidered cushion front panel, ensuring that the pompoms are facing towards the stitchery. Sew a seam along the trim to attach them to the cushion front.
7. Lay the cushion back on top of the cushion front, right sides together. The pompom trim should be in the middle of the two panels. Pin around the edges and then sew around, leaving a 2in opening in one side for turning.
8. Turn the cushion right side out, stuff it firmly with fibre fill and slip stitch the opening closed.
Angel With Star
9. Cut two lengths of ricrac approximately 5in, and two lengths of ricrac approximately 8in. Sew the longer lengths of ricrac down the longer edges of the stitchery panel. Then repeat with the smaller lengths of ricrac to create a border around the stitchery. Try to sew the ricrac directly over the top of the stitchery panel so it is effectively sewing it to the cushion front.
10. Lay the cushion back on top of the cushion front, right sides together. Pin around the edges and then sew around, leaving a 2in opening in one side for turning.
11. Repeat step 8.
Angel With Daisy
12. Cut two panels approximately 3in long from the self-adhesive felt ribbon. Peel off the back of the felt ribbon and stick them to the top and bottom edges of the stitchery design. Nicole placed half of the felt ribbon over the stitchery panel and left half on the blue fabric.
13. Sew the felt ribbon in place working a few small stitches and using a transparent or matching coloured thread. Work the stitches where there are large areas of felt and do not work the stitches from flower to flower.
14. Repeat step 5 using Blanc and working the stitches along the two longer edges of the stitchery panel.
15. Repeat step 10.
16. Repeat step 8.
The wooden daisy button, and pompom and ricrac trim are available from Buzzy Bee Buttons. For more information on these embellishments or other country stitchery projects designed by Buzzy Bee Buttons, write to PO Box 320, Seacliff Park SA 5049, phone 0401 649 477 or drop in to their online blog at www.buzzybeebuttons.typepad.com