Download the PDF with full diagrams and instructions here.
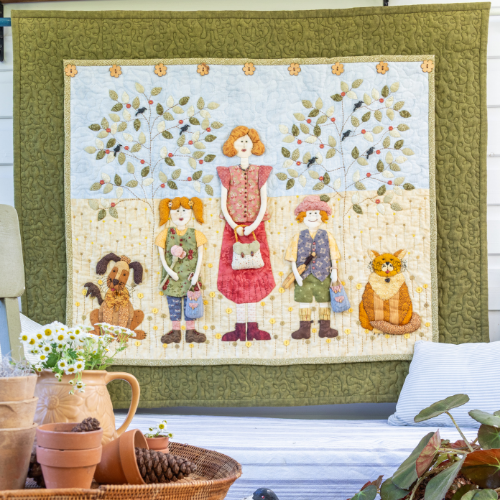
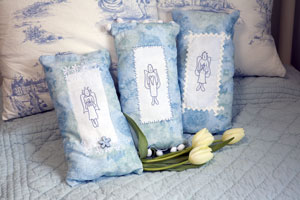
Leanne Peel of Crystalbrook Cottage couldnt have captured the meaning of life better than when she stitched the verse “Its the simple things that make life worth living” in this charming wallhanging. The centre panel is based on a drawing Leanne did of her daughters favourite teddy bear, Belly Button Bear, that she converted to embroidery. Although the design is worked in simple embroidery stitches, Leanne has added depth to the design using watercolour pencils.
Materials
45cm (½yd) seeded homespun (stitchery/appliqué panel and lining)
10cm (⅛yd) green daisy print fabric (Border 1)
15cm (¼yd) mustard mini spot print fabric (Border 2)
10 x 18cm (4 x 7in) dark green leaf print fabric (appliqué)
15cm (6in) square light brown tone-on-tone fabric (appliqué)
20cm (¼yd) green and cream stripe ticking (binding and hanging sleeve)
40cm (16in) square backing fabric
Batting at least 40cm (16in) square
DMC Stranded Embroidery Cotton in Variegated Baby Pink (48), Variegated Mustard (111), Black (310), Medium Brown (433), Very Light Brown (435), Tan (436), Violet (553), Medium Light Topaz (725), Light Cornflower Blue (794), Very Dark Coral Red (817), Dark Beige Brown (839), Light Copper (922), Medium Forest Green (988), Dark Green Grey (3051), Medium Mauve (3688), Very Dark Pewter Grey (3799), Ultra Pale Yellow (3823) and Light Rosewood (3859)
15cm (6in) embroidery hoop (optional)
Watercolour pencils in beige, light brown, medium brown, dark brown, light blue, yellow, pink and purple
Double-sided fusible web
Fusible interfacing such as Weaveline
Water-erasable fabric-marking pen
Micron permanent-marking pen in brown
Cotton buds
Quilt basting spray
Rotary cutter, ruler and cutting mat
Sewing machine with ¼in foot
General sewing supplies
Finished size: 38cm (15in) square
Stitches used: Back stitch, blanket stitch, chain stitch, detached chain (lazy daisy) stitch, French knot, satin stitch, straight stitch
Note: Please read all instructions before commencing the project. Careful and accurate cutting and sewing are essential to ensure success with this project. A seam allowance of 6mm (¼in) is included throughout. It is recommended that fabrics be 100% cotton, pre-washed and well ironed. Requirements are based on fabric 112cm (44in) wide. All embroidery is worked with two strands of thread unless otherwise stated.
Cutting
1. From the seeded homespun, cut:
Two squares, 16in (stitchery/appliqué panel and lining).
2. From the green daisy print fabric, cut:
Two strips, 1½ x 9½in (Border 1)
Two strips, 1½ x 11½in (Border 1)
3. From the mustard mini spot print fabric, cut:
Two strips, 2¼ x 11½in (Border 2)
Two strips, 2¼ x 15in (Border 2).
4. From the green and cream stripe ticking, cut:
Two strips, 2in across the width of the fabric (binding)
One strip, 3 x 15in (hanging sleeve).
Embroidery
5. Find the centre of the stitchery panel by folding it in half horizontally and press. Fold it in half vertically and press. The point where the two crease lines meet is the centre of the panel.
6. Using the Micron pen, lightly trace the stitchery design from the pattern sheet in Homespun Vol 12 No 3 in the centre of one of the seeded homespun squares. A light source such as a window, light box or glass-topped table with a desk lamp placed underneath will help to make the design more visible through the fabric. Fuse the interfacing to the wrong side of the stitchery panel and press well.
7. Place your work in the embroidery hoop, if desired, to keep it flat and prevent it puckering. Stitch the embroidery design through the fabric and interfacing, referring to the stitchery guide below. Stitching through the stabiliser allows for knots and small jumps between stitches to be hidden. Working with an embroidery hoop or frame may ensure you keep the tension even but keep in mind that leaving your project in the hoop when youre not working on it will leave crease marks which may be difficult to remove.
8. Once you have finished stitching, remove the fabric from the hoop and colour it in using the watercolour pencils, referring to the colouring guide below.
9. When you have finished the colouring process, dampen the end of a cotton bud with water and rub it over the coloured areas. Use a separate cotton bud for each colour. Press well with a hot iron. The process can be repeated if you would like the colours to appear darker.
10. When the stitchery is dry, place it face down on an ironing board and gently press from the back to set the colour.
Stitchery guide
Design area |
DMC Stranded Embroidery Cotton
Stitch
Bear
Body
Body centre”seam”
Belly button
Muzzle, mouth and inner ears
Eyes
Nose
Paws
Very Light Brown (435)
Tan (436)
Tan (436)
Tan (436)
Black (310) one strand
Black (310)
Tan (436)
Back stitch
Running stitch
French knot
Back stitch and running stitch
French knot
Satin stitch
Straight stitch
Birds
Body
Eye
Beak
Dark Beige Brown (839)
Black (310) one strand
Light Copper (922)
Back stitch
French knot
Straight stitch
Ladybird
Head
Body
Black (310)
Very Dark Coral Red (817)
French knot
Satin stitch
Worm
Body
Light Rosewood (3859)
Satin stitch
Tree
Trunk
Medium Brown (433)
Back stitch
Bird house
Outline
Landing post
Chain
Hole
Light Cornflower Blue (794)
Light Cornflower Blue (794)
Very Dark Pewter Grey (3799)
Very Dark Pewter Grey (3799)
Back stitch
Straight stitch
Chain stitch
Satin stitch
Flowers
Grass
Petal outline
Flower centre
Stem
Leaves
Dark Green Grey (3051)
Medium Mauve (3688), Violet (553) or Ultra Pale Yellow (3823)
Medium Forest Green (988)
Medium Forest Green (988)
Straight stitch
Back stitch
French knot
Back stitch
Detached chain (lazy daisy) stitch
Butterfly
Body
Wings
Antennae
Medium Brown (433)
Variegated Baby Pink (48)
Medium Brown (433)
Satin stitch
Back stitch
Straight stitch and French knots one wrap
Colouring guide
Design area |
Colour |
Bears body Bears muzzle |
Light Brown Beige |
Birds body |
Dark Brown |
Tree trunk |
Medium Brown |
Bird house |
Light Blue |
Flower petals |
Pink, Yellow and Purple |
Butterflys wings |
Pink |
Appliqué
11. Locate the appliqué shapes on the pattern sheet and using the pencil, trace the shapes onto the paper side of the fusible web, leaving about ½in between them. They have been printed in reverse to assist you. You will need to trace one tree foliage and four beehives.
12. Cut out all of the shapes roughly do not cut on the pencil lines yet. Fuse the shapes to the wrong side of your selected fabrics and cut them out on the traced lines. Put the beehive shapes aside.
13. Peel the backing paper off the tree foliage shape and fuse it in place on the stitchery panel, referring to the photograph as a guide. Using Dark Green Grey (3051), work blanket stitch around the outer edge.
14. Trim the embroidered panel to measure 9½in square from raw edge to raw edge, with the design centred.
Borders
14. Sew the 1½ x 9½in green daisy print strips to the top and bottom edges of the embroidered panel and press seams outwards. Sew the 1½ x 11½in green daisy print strips to the left and right edges of the embroidered panel and press seams outwards.
15. Repeat step 14 with the mustard mini spot print strips.
16. Referring to the photograph as a guide, position the four beehives in the corners of Border 2, with the base of each beehive facing inwards.
17. As you did in step 6, trace the verse and the bees onto each Border 2 strip using the fabric-marking pen, referring to the photograph as a guide for the correct positioning of each verse. Baste the second 16in square of seeded homespun to the wrong side of the embroidered 16in square. This will help create a quilted effect on your finished wallhanging as you complete steps 18 and 19.
18. Using Medium Brown (433), work blanket stitch around the raw edge of each of the beehive shapes. Using the same thread, work three rows of running stitch across each beehive. Work the beehive entrance in satin stitch using Black (310).
19. Work the verse in back stitch, adding French knots above the “is” and for the full stops, using Medium Brown (433). Satin stitch the bees bodies in Variegated Mustard (111), then work their wings in detached chain (lazy daisy) stitch using one strand of Black (310). Use the same thread to add two straight stitches on their bodies to represent stripes.
20. Using the quilt-basting spray, glue the batting to the wrong side of the wallhanging top, referring to the manufacturers guide for directions. Then repeat the process to glue the backing to the exposed side of the batting.
21. Quilt as desired. Leanne basted down the raw edge of the wallhanging top about 35mm (⅛¼in) from the raw edge. She then stitched in the ditch between the stitchery panel and Border 1, as well as between Border 1 and Border 2.
22. Trim the backing and batting ¼in outside the edges of the wallhanging top. Remove any pen marks by running the edges of the wallhanging top under cold water. Press with a towel and allow it to dry flat.
23. To make a sleeve for your wallhanging, fold the 3 x 15in green and cream stripe ticking strip in half, wrong sides together and long edges matching, and press lightly. Open out the strip and fold over the short ends ¼in, and again by ¼in, and machine stitch to form a neat seam edge. Fold the strip in half, wrong sides together and long edges matching, and pin it to the top of the wallhanging backing, raw edges matching.
24. Cut the ends of the 2in green and cream stripe ticking strips at a 45-degree angle, join the strips to make one long length, trim the seams and press them open. Fold the strip in half, wrong sides together and long edges matching, and press. With raw edges together, stitch the binding to the edge of the quilt using a ¼in seam, mitring the corners as you go and referring to the diagrams on page 86 of Homespun Vol 12 No 3 for details.
25. Turn the binding over and stitch it by hand to the back of the quilt. Label and date your quilt.
26. Pin the bottom of the hanging sleeve to the back of the wallhanging, allowing it to bag slightly to allow for the circumference of a dowel rod and slip stitch it in place, taking care that your stitches are worked only through the backing fabric and batting and do not show on the front of the quilt.
For more information on other charming designs by Leanne Peel of Crystalbrook Cottage, write to PO Box 895, Berwick Vic 3806, phone 0409 705 607, email crystalbrookcottage@hotmail.com
or visit her blog at http://crystalbrookcottage.blogspot.com